UP
WITH THE BOOST
Simple and Effective Boost Control for Toyota 1G-GTE Twin Turbo 6
Written by Jonathan Walker supragt@ihug.co.nz
[ Turbo control | Stage 1 | Stage 2 | Tuning ]
Tuning the system:
After ensuring everything is done with 100% care, and that there are no air leaks in any of the hoses, and that everything is connected properly, it’s time to go for a drive. Start the engine, and (using a small hose if you wish) search around all your connections for air leaks. Air leaks will be the enemy of the set up so it’s important everything is completely sealed.
To start out, ensure the pressure regulator is fully open (fully clockwise), and the needle valve is fully closed (fully counter clockwise). Try the boost out in different gears, and at different speeds, as the more effective the intercooler at any time, the higher the boost will be (due to the lower air pressure after the cooler, where we are taking our pressure from). Don’t forget we want to FULLY OPEN the throttle during our test runs ;) . With the system fully closed (needle closed, regulator open – pull to adjust, push to lock), the boost will lift a couple of PSI. Once it is established that the boost is in fact controlled (boost doesn’t rise above 1-2PSI over standard boost), we may begin to control the pressure to the wastegates.
Open the needle valve 1/3-1/2, and test again. Once again, use several gears to obtain different speeds and assess the highest boost level, with the needle ½ open, it should rise another 1-2PSI. Close the pressure regulator until you feel the resistance decrease (counter clockwise to close), and back off a turn or so, this will be close to the feed pressure we are seeking. If the boost rises too high, close the needle valve slightly, as the needle valve is bleeding out, and therefore increasing boost at this stage.
Take another drive, and test out in several gears. If the boost rises too high, back the pressure regulator off some more. Begin closing the regulator a ½ turn at a time. The peak boost will begin to rise. When you reach your ideal boost level, and verify it’s where you want it, and lock the regulator by pushing the knob down.
You can control how quickly the pressure to the wastegates rises using the needle valve, and therefore control how quickly the boost rises. The pressure regulator will attempt to keep the pressure on it’s outlet side constant, and the more air you bleed out with the needle valve, the more boost pressure is required by the regulator to pressurise the system, therefore, the quicker the boost will rise. If you open the needle valve too much, the boost will spike beyond your set limit, and if you open the needle valve further still, the wastegates will not operate and you run the risk of nuking your turbos (or engine, whichever gives first). You may wish to have a slight boost spike, however I set mine for a ceiling of 15-16PSI (weather dependant).
Fuel Cut: If your car is by any standard, standard, you may well encounter what is known as ‘fuel cut’ when running the higher levels of boost. This happens when the ECU can no longer reliably fuel the engine at such a high boost. Rather than let the engine run insufficiently rich, running the risk of detonation, and other associated BAD things, the ECU cuts the fuel altogether. This happened once to me during the tuning phase, at 16PSI on a very cold night. Please note that the weather will effect where your fuel cuts. The colder the weather – the denser the intake charge, therefore the more fuel is required at any given boost level. If you are just licking your fuel cut in warm weather, a good boot in the cold will show you what it’s all about. The engine power will cease and the check engine light will come on for a second. The engine will return to normal after this. If it happens, it’s time to back the boost off a notch.
You have probably heard of an FCD of “Fuel Cut Defender/Defeater”. You do not want one, unless you are doing other modifications to the fuel delivery system to get more fuel into the engine (more fuel than the stock system). If you install a fuel cut defender and you have not modified your fuel system, you may soon be exploring hither to unexplored realms of detonation, and expensive engine breaking. Running insufficiently rich for 10 seconds under boost is enough to completely nuke an engine’s internals due to the extreme cylinder pressures associated with detonation. For more info, read Stu’s note on fuel cut in the technical section.
Disclaimer: All tests performed on a private track under supervision.
|
|
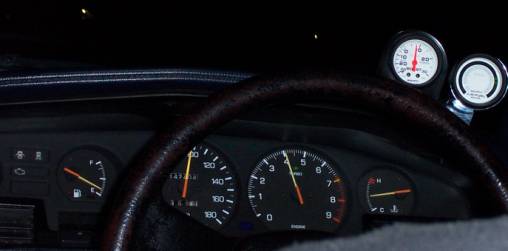
This was just after installing the boost kit. The boost is hitting 9PSI, which was predicted for the boost level with the system closed. The next step is opening the needle valve up…. |
|
|
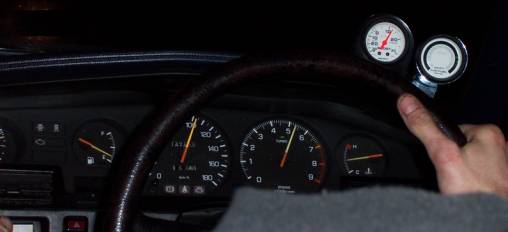
The needle valve is now approximately ½ open, with the boost peaking at 12PSI. Next I will begin to close the pressure regulator to bring the boost up, I will also close the needle valve about 1/5 of a turn to reduce the flow and make the boost climb more steady and stable. |
|
|
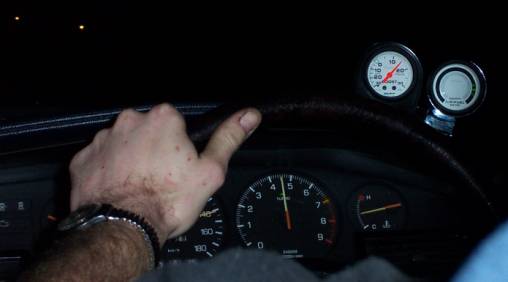
After a few runs, the boost is now where I want it - steady at 15PSI. It holds at 15 through the longest period of sustained boost I’ll be giving it, 3rd gear. As the engine speed increases you can hear the turbo speed increase to keep up instead of remaining constant with the boost level falling, it’s great! The pesky speedo is faulty though, and reads 140 when I’m only doing 100! Muhahaha. |
Once you have set your desired boost level you can begin to play with different regulator/needle valve settings to obtain different results. In order to create a boost ‘spike’, you open the needle valve further, so the regulator cannot open the wastegates until more pressure has been built. This will result in a temporary (or if open too far, permanent) increase in boost when punching it. When set correctly, you can have the needle valve bleeding enough to keep the wastegates closed until about 10PSI of boost. You will notice the sound of the wastegates opening (beautiful sound!).
That pretty much concludes this tutorial on raising the boost on a 1G-GTE. The next chapter will unfortunately be “Installing a racing clutch in your Supra” after 15PSI destroyed my clutch. If you are running with a standard clutch you’ll most likely break it at high boost, and the more you pay, the longer it lasts. The clutch in my car was a $600 job, same as Robbi Wright’s according to the guy that sold me the car. The next step is either the $835 Performance Clutch/Auto Clutch custom job, with metal facing paddle type disc and a better cover, or the TRD bronze facing clutch with TRD cover for $1380. Tough choice there…
Happy boosting and BUCKLE UP - IT’S A GOOD FEELING!
[ Turbo control | Stage 1 | Stage 2 | Tuning ]